Friday, October 31, 2014

Baked Goods of Doom

I'm a holiday nerd. In years past I've decorated and decorated and decorated every house we've lived in. Every room, every holiday, every year. But I've limited myself to one new decoration per year for several years now. It's good for the
budget but let's be frank, I don't need any more decorations. Anytime I saw a cute new Halloween thing this year, I decided I would quench my holiday shopping bug by buying it for the neighborhood BOO. Do you BOO? Here's some instructions on how to do it. The cool thing to me about this is you don't need a committee, you don't need the homeowner's association, you really don't even need to like your neighbors all that much! BOOing is much like giving and volunteering in any form - it gives joy to the giver. I hope you'll try it out and come back and tell me what you did - all the details! 

My just-graduated-from-college-and-has-her-first-job aged daughter and I did the BOOing this year. I found some cool Halloween-themed burlap little bags at T. J. Maxx and filled them with some candy and other fun Halloween-themed items like pumpkin-shaped soap dispensers, glow-in-the-dark bracelets, and Halloween cocktail naptkins. And I bought some carving-sized pumpkins. The pumpkins made it
kind of hard to be discreet when delivering the goods to a doorstep, so we decided to I would drive the get-away mom van and she would drop the goods, ring the doorbell and run. And when I say we decided this, I definitely mean I decided this. She wanted to drive. You see, BOOing is supposed to be anonymous. And the problem the with the process is that you will laugh so hard while dropping, ringing the bell, running, and driving away, that you can easily get caught! We didn't but wow, did we laugh! We had to take breaks in between houses to catch our breath! So funny!!!

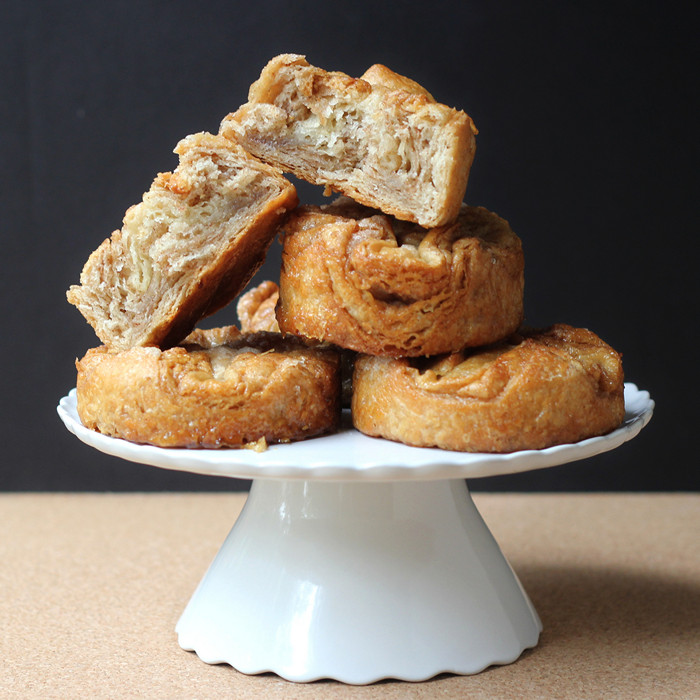
Willie and I went to a cooking class recently and he's been baking bread every since. The bread is gorgeous and so good and he's been trying out different shapes with this dough which makes baking times different. You will have to play around with this recipe's baking times but that is the fun of bread-baking, right? Remember to use your nose. You'll smell the bread when it's done. The baking inspired my Halloween decoration purchase of the year. I bought a GROSS of vampire teeth. One gross is a dozen dozen in case you don't know. That's 144. Why? I knew the bread had soul. I knew it would do well with a face. And Amazon had a gross of these fangs for the same price as 6 in the store. So there you have it.

I've added faces to things I've baked and I've added faces to baked goods from the store. I've even added faces to lunch and dinner with no baked goods at all. I suggest you try it as well. It's so fun. ~Sandra


P.S. The eyes are made of sugar from Wilton's and are affixed with a little dab of peanut butter.

Stand Mixer French Bread
by Willie
adapted from Sur La Table's Cooking Class called Bread Baking 101

Poolish:
1 1/2 cups Bob's Red Mill Organic Unbleached White Flour
3/4 cup water
a pinch or yeast

Dough:
2 1/2 cups Bob's Red Mill Organic Unbleached White Flour
1 teaspoon instant yeast
2 teaspoons kosher salt
the poolish
3/4 cup water

Poolish:
Combine the ingredients, cover, and set aside for 12-24 hours.

Dough:
Add all ingredients together and mix with a paddle attachment for 3 minutes in a stand mixer. Switch to a dough hook and knead for 4 minutes.


Add teeth and eyes to anything, 
even store-bought goods.
Transfer the dough to an oiled bowl and let it rise for 2 hours. You can turn the dough at the one hour mark if you like (if the dough is wet or doesn't seem to be rising well).

Preheat the oven to 500 degrees.

Divide the dough in 3 pieces and shape into logs. Let it rest for 20 minutes and then shape into baguettes. Put the baguettes on a baguette pan or other cooking sheet and let proof until puffy (30-40 minutes).

Before putting the loaves into the oven, diagonally slash the loaves. Sprinkle the loaves with a little water and place in the oven. Reduce the temperature to 475. Bake for 18 to 24 minutes when they are a deep, golden brown. Cook on a rack before eating.

Thursday, October 30, 2014

Not Your Ordinary Blueberry Muffins

I'm always looking for new breakfast ideas for my husband and son and this one definitely hit a home run! I serve them still warm with a dab of butter, a side of scrambled eggs and fresh berries. I hope you enjoy these as much as we do.

Not Your Ordinary Blueberry Muffins
by Holly
Adapted from Martha Stewart's "Hearty Blueberry Muffins"

3/4 cup Bob's Red Mill Organic Whole Wheat Flour
3/4 cup Bob's Red Mill Organic Unbleached White Flour
1/4 cup almond flour
1/2 teaspoon baking soda
1/4 teaspoon fine ground sea salt
1/2 cup packed dark brown sugar
3/4 cup vanilla Greek yogurt
1/4 cup expeller pressed virgin coconut oil, melted and slightly cooled
2 large eggs, at room temperature
8 ounces fresh blueberries, rinsed

Heat oven to 375°F. Line a standard size 12-cup muffin tin with paper liners.

In a large bowl, whisk together all 3 of the flours, baking soda and the sea salt.

In a medium bowl, blend the brown sugar, yogurt, coconut oil and eggs until just combined.

Add the sugar mixture to the dry mixture until just mixed. Gently fold in the blueberries.

Divide the batter into the 12 cups. (It will seem very thick). Bake until browned, about 18-20 minutes. Use a toothpick to test doneness (test the cake, not the berries.) Cool 10 minutes in the pan, on a rack for 10 minutes. Transfer to rack and cool completely.

It's Halloween and the Undead are Rising!

Ah, Halloween. Time for thrills, chills, ghouls, and - of course - TREATS.

These adorable-horrible coffins, while not written for a 37 Cooks challenge, does feature two of our previous sponsors.

The coffin cookie cutter is made by Good Cook, who sponsored the Picnic Potluck Panic challenge. The coffin cookie cutters weren't part of the challenge, though.

And, of course, Bob's Red Mill supplied us with bags of all-purpose flour, which is what I used here.

The bag of flour I got from Bob's is long gone, but that's to be expected in my house. Flour doesn't last here very long at all.

I had a lot of fun assembling these coffin cookies. I colored the icing I used for assembly using food coloring to make it brown so it didn't stand out quite as much against the dark cookies. I used plain white royal icing to form the hands that are creeping out of the coffins. Spooooky.

The nice thing about the coffin cookies is that you can fill them with even more goodies. How about some chocolate mousse? I attached the lids, but it would be fine if it was un-attached, too.

I use black cocoa quite often. It's sold under quite a few names, depending on the seller, but it's a distinctive and very dark cocoa. If you don't have it, you can use regular cocoa. The cookies won't be quite as dark, but they'll still be good.

Chocolate Cut-Out Cookies

3 ounces chocolate chips
2 1/2 cups all-purpose flour
1/4 cup unsweetened black cocoa powder
1/2 teaspoon baking powder
1/2 teaspoon salt
1 cup (2 sticks) unsalted butter, at room temperature
1 1/3 cups sugar
1 large egg
1/2 teaspoon vanilla extract
Royal icing (recipe here)

Put the chips in a microwave-safe bowl or measuring cup and heat in 30-second intervals, stirring in between, until they're melted. They don't need to be hot - just softened and melted and smooth. Set aside until it has cooled to room temperature.

Combine the flour, cocoa, baking powder, and salt in a medium bowl. Whisk or stir until they're well combined. Set aside.

In your stand mixer with the paddle attachment, or with an electric mixer, beat the butter until it's smooth. Add the sugar, and beat until it's light. Add the egg and beat until it's incorporated. Add the melted chocolate chips and the vanilla. Beat until they are incorporated.

Add the flour mixture (you might want to add in several additions to keep it from flying around when you start the mixer) until the flour is incorporated. You don't need to beat it any further once it's mixed together.

Place the dough in a zip-top bag and flatten it. Refrigerate for at least four hours, or up to a few days.

When you're ready to bake, remove the dough from the refrigerator and let it warm up just a little bit. Heat the oven to 350°F and line a few baking sheets with parchment paper.

Divide the dough into several pieces to make it easier to work with. Flour your work space lightly - you don't want to add too much flour to the cookies, so be gentle. Roll the dough to between 1/8- and 1/4-inch thick - smaller cookies are best if they're rolled thinner, while larger cookies are easier to work with if they're a little thicker.

Cut the cookies with cookie cutters as desired. If you want your very own 3D coffin cookie cutter, you can get it from Good Cook.

Transfer the cookies to your prepared baking sheets, leaving a little space between them. These don't spread a lot, but they do grow a little.

If you're baking cooking that are different sizes - like the 3D cookies I made that has smaller pieces for the sides and larger pieces for the top and bottom - put the smaller pieces in the center of the baking sheet and the larger pieces along the edges of the sheets.

Bake at 350°F until the cookies are firm on top and slightly darker around the edges. Since these are pretty dark to begin with, it's sort of hard to see browning, but if you look, you'll see a slight difference - about 12 minutes.

Let the cookies cool for a minute or two on the baking sheets before moving them to a rack to cool completely.

Decorate the cookies as desired.

Blueberry and Nectarine Buckle

A buckle? What is a buckle? No. Not the clasp that holds your belt together. It's an old-fashioned, summertime, English dessert and a quite tasty one at that!

The original recipe (from Real Simple magazine's July 2013 issue) calls for peaches, but to be honest, I couldn't find any good ones. However, I had perfect nectarines and decided to give those a try. So glad I did!!

Blueberry and Nectarine Buckle
by Holly
Adapted from Real Simple magazine's "Peach and Blueberry Buckle" Recipe

1 3/4 cup Bob's Red Mill Organic Unbleached White Flour
2 teaspoons baking powder
1/2 teaspoon fine ground sea salt
1/4 teaspoon ground orange peel
8 Tablespoons (1 stick) unsalted butter, room temperature
1 cup light brown sugar, packed
1 large egg, room temperature
1/2 teaspoon pure vanilla extract
1/2 cup sour cream
4 nectarines, cut into 8-10 wedges (about 4 cups worth)
1 pint blueberries, rinsed and stemmed
1/3 cup sliced almonds
Confectioner's sugar, for dusting the top

Heat oven to 350˚. Place rack on lower third of oven to prevent premature browning of the buckle.

In a large bowl, whisk together the flour, baking powder, salt and orange peel.

In a medium bowl, beat together the butter and brown sugar with a hand mixer until fluffy, about 3 minutes. Add egg and vanilla until just incorporated.

On low, alternate adding half the flour, then the sour cream and the rest of the flour. With a spatula, fold in the nectarines and blueberries. It'll seem like there's more fruit than cake, but that's ok. The cake will expand when cooked.

Place the batter into a 8" x 8" baking dish. Sprinkle the almonds on top. Bake until browned, about 1 hour 15 minutes to 1 hour 30 minutes. Use a toothpick to test doneness (test the cake, not the fruit.) Cool 10 minutes in the pan, on a rack for 10 minutes. Dust with confectioner's sugar and serve warm.

Wednesday, October 29, 2014

Mini Farfalle with Creamy Four Cheese Sauce

Mini Farfalle with Creamy Four Cheese Sauce
by Lesia

1 box mini farfalle, cooked according to box directions
4 Tablespoons butter
3 cloves crushed garlic
4 Tablespoons Bob's Red Mill Organic Unbleached White Flour
2 1/2 cups whole milk
1 teaspoon salt
1/2 teaspoon pepper
1/2 cup heavy whipping cream
1/2 cup crumbled Feta cheese
1/2 cup shredded Asiago cheese
1/2 cup shredded Parmesan cheese
1/2 cup shredded Romano cheese

In heavy saucepan, melt butter and saute' garlic lightly until aromatic. Add flour and stir until smooth. Add milk, salt and pepper and cook on medium-high heat until thick and bubbly. Stir frequently so there's no scorching in the bottom of the pan. Add heavy whipping cream and all cheeses. Reduce heat to low and stir until smooth and cheese is melted. Serve over pasta immediately. This dish is also great with grilled chicken and/or freshly steamed broccoli served on top.

Double Dipped Fried Green Tomatoes

I have found that these little jewels are much more scrumptious when fried in a a cast iron skillet, however, the cast iron skillet is not a requirement for a crispy crust. You can also use an electric skillet set on the highest heat setting, just make sure to stand guard over the skillet so that the tomatoes don't burn. That would be a travesty!

Double Dipped Fried Green Tomatoes
by Lesia

10 thin slices green tomato, patted dry with a paper towel
Oil for frying
Buttermilk for dipping
1 cup Bob's Red Mill Organic Unbleached White Flour
1/2 cup cornmeal
1 teaspoon salt
1 teaspoon black pepper
1 teaspoon Cajun seasoning
2 teaspoons sugar
Extra sugar for dusting

Heat oil in skillet of choice. You'll need enough oil to almost cover the slices of tomato completely, but not too much. No one likes a soggy fried green tomato.

Fill a small mixing bowl with buttermilk. In a separate mixing bowl, mix together the flour, corn meal, salt, pepper, Cajun seasoning, and 2 teaspoons of sugar until well-combined.

Dip the tomato slice in buttermilk then cover well with flour mixture. Repeat the dipping process one more time then place in hot oil. Cook until well-browned on each side. Drain tomato slices on a layer of paper towels. After each batch is cooked and transferred to paper towel, sprinkle lightly with sugar. This step is optional, but it's one I never leave out and I've been told they have the perfect balance of "tang and sweetness".

Tuesday, October 28, 2014

Cheese Ravioli with Pesto Sauce

My friend, Stacie, holds cooking classes at her home on Ford Island, Hawaii. From her home you can see the Arizona Memorial and I feel like I have stepped back in time, as her home is one of the original military quarters that survived the attack on December 7, 1941. It was fun to learn how to make pasta with Stacie and when we received flour as our challenge, I thought it was time to try out my new pasta machine and put my lessons to good use. The picture of the ravioli certainly do not do this recipe justice, as they were delicious. My husband loved it, even though I did not add any meat.

Cheese Ravioli with Pesto Sauce
by Nancy
Adapted from Stacie Husmann, owner of Cooking Thyme with Stacie (fresh pasta)

3 large eggs
1 teaspoons salt
2 -3 Tablespoons water
2 teaspoons olive oil
2 1/2 level cups Bob's Red Mill Organic Unbleached White Flour

Combine eggs, salt, water and olive oil in a bowl. In a food processor add the flour and pour the egg mixture, pulse a few times. Combine the mixture until it resembles small crumbs. Test a small portion by squeezing it between your forefinger and thumb. If it sticks together it is good, otherwise add an additional Tablespoon of water and pulse the mixture. (I needed 2 1/2 Tablespoons of water using the Bob's Red Mill flour.)

Turn out the dough onto a floured surface.  Knead the dough about 10 minutes, folding it over itself. Wrap the dough in plastic wrap and let it rest for 30 minutes.

Roll out the dough into thin sheets, either by hand or with a machine. If using a machine, set the pasta machine on the widest setting, which is usually setting the number to "1" on the dial (please read the instructions on your machine as this could be reversed.) Divide the dough into quarters and work with one section at a time. Flatten out the first piece of dough into a rectangle. Feed it through the machine, then fold it over and feed it through again. You need to do this about 12 times. It will make the dough smooth and elastic. Without folding the dough between settings, keep reducing the settings until the dough is rolled as thinly as you like it. If the sheet of pasta gets too long, cut it into sections to make it easier to work with.

Place one sheet of dough on a floured ravioli pan. Spoon 1 level teaspoon of the cheese ravioli filling (recipe below) into each section. Cover with another sheet of pasta. With a rolling pin, roll until the pieces are cut, then turn out onto surface.

Bring a large pot of water to a boil and add a few Tablespoons of salt. Add the ravioli and cook 2-3 minutes, or until al dente. Drain and toss into the pesto sauce (recipe below), garnish and serve.

Cheese Ravioli Filling 
by Nancy
Adapted from Stacie Husmann

1 1/2 cups (15 ounces) whole milk ricotta
3/4 cup (3 ounces) coarsely grated mozzarella, at room temperature
1/4 cup mascarpone cheese, at room temperature
1/4 cup freshly grated Parmesan, at room temperature
1/4 cup fresh bread crumbs
1/4 teaspoon Italian seasoning
3/4 teaspoon kosher salt
1/4 teaspoon freshly ground black pepper

In a medium bowl, mix all ingredients. Ingredients for approximately 100 raviolis.

Pesto Sauce
by Nancy

1/4 cup butter
6 Dorot garlic cubes
2 Dorot basil cubes

Place all ingredients in a small saucepan and heat thoroughly. Serves 2.

Monday, October 27, 2014

Whole Wheat Sesame Loaf

If you want a seriously soft and fluffy whole wheat bread, this is the one for you. It's soft, it's fluffy, it's light, it's squishy. And it's nice for sandwiches or toast.

The dough is very loose and sticky, so I suggest kneading with a stand mixer, if you have one. If you knead by hand, the stickiness of the dough is going to make you want to add flour to keep it from sticking to the work surface and to your hands.

It wouldn't be awful if you added a tad more flour, but try not to add too much.

If you like, this is the type of dough you can knead in bowl using a large dough scraper to move it around. It really is that loose and goopy.

Whole Wheat Sesame Loaf
by Donna

1 cup lukewarm water
2 1/4 teaspoons active dry yeast
1 cup Bob's Red Mill Organic Whole Wheat Flour
1 large egg
2 cups bread flour
1 teaspoon salt
2 Tablespoons honey
2 Tablespoons unsalted butter
Toasted sesame seeds, as needed

Put the water, yeast, and whole wheat flour in the bowl of your stand mixer and let it sit at room temperature for an hour. Yes, I'm serious. Let it sit and bubble.

Add the egg, bread flour, salt, honey and butter.

Knead with the dough hook until the dough is elastic. It will be sticky and very soft. Cover the bowl with plastic wrap and set aside for an hour. It should be doubled in size.

Spray a 9 x 5 loaf pan with baking spray. Use a dough scraper to transfer the dough to the loaf pan. Sprinkle sesame seeds on top (this will help keep the dough from sticking to your fingers) and use your fingers to press the dough into the pan so it fills it mostly evenly. It's fine if the dough doesn't fill completely into the corners.

Sprinkle more sesame seeds on top, if you like. Cover the pan with plastic wrap and let the dough rise until it reaches the top of the pan or slightly higher - about 30 minutes.

Meanwhile, preheat the oven to 350°F.

When the dough has risen, remove the plastic wrap and bake the loaf at 350°F until it's nicely browned and it reaches 200°F in the interior - about 40 minutes.

Remove the loaf from the pan and let it cool completely on a rack before slicing.

Kouign Amann

I never made kouign amann before - never even sampled them. So that seemed like a perfect challenge for using flour from Bob's Red Mill.

Because I must be crazy.

Like croissants or pie dough, the kouign amann is a laminated dough, with layers of butter between layers of dough. But it's got more sugar than a typical croissant.

I did a lot of research, then tried a few of my own versions. I have to say I'm pretty happy with the results. Along with the sugar, I added cinnamon, because I love cinnamon. You could leave it out if you don't like it.

The key to making this recipe is to make sure the butter never gets too soft. It needs to be soft and pliable enough to roll, but not so soft that it begins to incorporate itself into the dough. If it's done right, you get buttery, flaky layers.

But even if it goes wrong, it's not all bad. You end up with a very buttery sweet dough, rather than layers.

Kouign Amann
by Donna

For the dough:
1 cup lukewarm water
2 1/4 teaspoons Red Star* active dry yeast
1 Tablespoon sugar
3 to 3 1/4 cups (14 5/8 ounces) Bob's Red Mill Organic Unbleached White Flour, plus more for dusting
1 teaspoon salt
2 Tablespoons unsalted butter
1 Tablespoon vanilla extract

For the butter layer:
8 ounces butter (salted or unsalted; your choice)

For the sugar filling:
1 cup sugar
1 Tablespoon cinnamon

Plus more sugar for dusting:
Figure about 1/2 cup additional sugar

Plus:
A little extra butter (because you can)

Combine all of the dough ingredients (starting with 3 cups of flour) in the bowl of your stand mixer and knead until the dough is smooth and elastic. The dough should be just a little firm - not soft, loose, or sticky. If you need to, add more flour. I used all of the extra 1/4 cup. You might need more. The dough should be bouncy and not dense.

If you don't have a stand mixer, you can knead by hand, if you prefer.

When the dough is elastic, cover the bowl with plastic wrap and set aside until the dough has doubled in size, about an hour.

While the dough is rising, put the butter in a zip-top plastic bag and center it in the bag. If you have two 1/4 pound sticks, place them side-by-side. I used a 1/2 pound block of butter. Use your rolling pin to first pound the butter, then roll it to form a square about 9 inches square. This doesn't need to be exact. Do your best. And it doesn't matter if it's not a straight-sided square. Just do your best.

Refrigerate the butter until it's needed. It's very important to keep the butter cold throughout this process.

When the dough has risen, flour your counter top and turn out the dough. Form it into a rough square, then use your rolling pin to roll it to a 12-inch square. Get the butter from the refrigerator and peel off the plastic. Place the butter on the dough square so the points of the butter square are pointing towards the sides of the dough square.

Like this:

It doesn't matter if everything isn't perfectly square and even. Fold the dough flaps on top of the butter to enclose it completely.

Use the rolling pin to roll the dough to approximately 12 x 16 inches. It's fine if it's not exact. The only time this dimension is actually important is the final roll before cutting. I'll warn you.

Keep your work surface floured as much as you need to so the dough doesn't stick to the counter or rolling pin, and if you see any bits of butter poking through the dough, sprinkle some flour on the butter to cover it.

Fold the dough in thirds, like a letter. (Do people fold letters any more? Okay, like a tri-fold wallet, then.)

If the butter felt soft and the dough was sliding on top of it during the rolling, STOP and put the dough on a baking sheet, cover it, and put it in the fridge to firm up, about 30 minutes. If the butter didn't feel squishy or slippery, make one more roll and fold exactly the same way, then put it on a baking sheet, cover, and refrigerate for at least 30 minutes. You can leave it longer. An hour is fine. Tomorrow wouldn't kill anything, if you happened to have a grocery shopping emergency and you needed to go out for a long while.

But, we want to eat these soon, so try for the 30-60 minute window.

Flour your work surface again. Mix the 1 cup of sugar with the Tablespoon of cinnamon and have that standing by. Roll the dough to 12 x 16 inches as before. With one of the longer sides of the dough facing you, sprinkle about half of the cinnamon-sugar mixture on the right 2/3 of the dough, then use your rolling pin to press the sugar into the dough a bit. You don't need to be exact - this is dough, not brain surgery.

Fold the left, un-sugared flap of dough over the middle third, then flip that over the final third of sugared dough. In theory you could flip the sugared part over the center, but at this point the sugar is a little loose on top of the dough, so it's better to go the other direction.

Again, if the butter felt soft and slippery, refrigerate NOW. Otherwise roll, sugar, and fold as before. Then cover and refrigerate the dough for another 30-60 minutes. If any of the sugar-cinnamon mixture spilled out of the dough, just scoop it up and sprinkle it on top of your dough.

Now we need to decide how to form the kouign amann. On my first try, I used 4 English muffin rings, 4 smaller rings that I had made by cutting the top and bottom out of bamboo shoot cans, and 4 jumbo silicone muffin cups.

Pastry rings are apparently traditional, and provide a crunchy bottom crust. If you use silicone muffin cups (or some people use a jumbo muffin pan), you'll have a sticky caramel-like bottom, sort of like what you'd get from sticky buns.

I did like the sticky-bun bottoms when the KA (kind of tired of typing that name) were warm, but they were a little goopy to store and the sugar was more chewy than crunchy. I liked the ones baked in the rings better. But I wouldn't turn down either one.

So, on batch #2, I made 6 in the muffin rings, and 6 in the shoot can rings. Place your rings on a baking sheet. (Here's a suggestion that I didn't try yet: Use a silicon baking mat in the bottom of the pan for easier cleanup and to let you peel off the crunchy sheets of caramelized sugar that oozes out of the pastry rings.)

Most of the instructions I read suggested buttering the rings, but I sprayed mine with baking spray because that's a whole heck of a lot easier.

Yeah, I'm making ridiculous pastry that takes two days, but I don't want to butter some pastry rings. Go figure. But then, just because I wanted to, I added a tiny sliver of butter in the center of where each pastry ring was sitting. I mean, why not?

Beep! When the time is up, dust your counter top with sugar and place the dough on top of the sugar. Sprinkle the top of the dough with more sugar. Yes, you're dusting with sugar rather than flour this time around.

Once again, roll the dough to 12 x 16 inches. This time we're serious about the size. Actually, roll it slightly larger than 12 x 16 so you can trim all the edges. Sprinkle with more sugar as needed to keep the dough from sticking. And, well, to add more sugar. I used another 1/2 cup, total, by the time it was all done.

Trim the edges of the pastry so you've got a nice even rectangle that's 12 x 16 inches. Now, cut the pastry lengthwise into three 4-inch strips, and cut the three strips each into four 4-inch squares. You should have a total of twelve 4-inch squares.

Fold the four corners of the first pastry inward and stuff it into your pastry ring, muffin cup, or whatever you're using. Keep going until all the pastry squares are settled into place. If you have any extra sugar on the counter, you can gather that up and sprinkle it on top of the dough in the rings. Cover the whole pan with plastic wrap or slide it into a large plastic bag and refrigerate overnight.

Have a nice little rest, Kouign Amann!

Meanwhile, you have those scraps, don't you? Hehe. I piled mine into 2 silicone baking cups with a dab of butter at the bottom. I let the rise, then baked them at 375°F until they were golden and toasty, about 25 minutes.

And then they disappeared.

'scuse me, I seem to have some sugary crumbs on my fingers...

When you're ready to bake the real batch of Kouign Amann, take the dough out of the refrigerator and give it 30 minutes or so to take some of the chill off. An hour is fine, particularly if your house is cool.

Preheat the oven to 400°F. Remove the plastic wrap and put the KA in the oven and then lower the temperature to 325°F. Bake at 325°F until they're a lovely golden brown, about 45 minutes. (They'd cook faster at 350°F, and I think they might be safe from sugar-burning at that temperature, but I haven't tried that yet. Maybe the next batch.)

Remove the pan from the oven and let the pastries cool slightly (just until you can handle them) before moving them to a rack to cool completely. Whatever you do, don't leave them on the pan to cool, or they'll weld themselves to the pan and you'll be very, very unhappy.

These can be served warm or at room temperature. They're best on the day you bake them, but I wouldn't turn one down if it was a day or two old.

*If you're using a brand of active dry yeast other than Red Star, let it dissolve in the water for a few minutes before you add the flour; if you're using Red Star, you can add it all at once and just start mixing.

Friday, October 24, 2014

Chocolate Chip Honey Cake

Chocolate Chip Honey Cake
by Christine


1 cup powdered sugar
2 Tablespoons milk
2 1/8 teaspoons vanilla, divided
2 sticks unsalted butter, room temperature
1/2 cup plus 2 Tablespoons Splenda/sugar blend
4 large eggs
2 Tablespoons avocado honey
2 teaspoons dried minced lemon peel
2 cups Bob's Red Mill Organic Unbleached White Flour
1/2 teaspoon baking powder
1 teaspoon kosher salt
1 cup milk chocolate chips

Preheat oven to 350°F. Grease the bottom of loaf pan and flour lightly. Mix powdered sugar, milk and 1/8 teaspoon of vanilla until smooth and set aside. In a large bowl cream butter and sugar until light and creamy with a hand mixer. Add eggs, one at a time, beating well after each addition. Add the remaining 2 teaspoons of vanilla, honey and lemon peel and mix until blended. Add the 2 cups of flour, a little at a time, along with the baking powder and salt. mix until just blended. Add the chocolate chips and mix lightly.

Pour into greased loaf pan and even the top. Bake for 55 minutes. Test in middle with a toothpick for doneness. Cool in pan, then turn onto a cooling rack. Place a sheet of parchment paper under rack and drizzle with glaze. Cool completely before storing.

Orange Glazed Breadsticks

Orange Glazed Breadsticks
by Christine

2 Tablespoons butter
5/8 cup water
1/4 cup milk
1 teaspoon salt
1 Tablespoon avocado honey
1/4 teaspoon cinnamon
1 teaspoon dried minced orange peel
2 cups Bob's Red Mill Organic Unbleached White Flour
1/2 cup Bob's Red Mill Organic Whole Wheat Flour
1 1/2 teaspoon bread machine yeast
1 cup powdered sugar
2 Tablespoons milk
1 teaspoon dried minced orange peel
Egg wash

Load first 10 ingredients into bread machine and select dough-only cycle. When cycle is finished, place dough in a lightly oiled bowl and cover with plastic wrap. Let rest for 20 minutes. Preheat oven to 350°F. Mix powdered sugar, milk and orange peel until smooth and set aside. Cut dough into 4 pieces. Roll each section into a long log and slice into breadstick length of your choice. Place breadsticks on cookie sheet and brush with water. Let rise for 30 minutes. Bake for 5 minutes and brush with egg wash. Bake for another 7 minutes or until golden brown. Cool and drizzle with orange glaze

Thursday, October 23, 2014

Velvety Cream of Mushroom Soup with Herbs

If you crave a creamy, delicious mushroom soup like I do, you will love this recipe! Even better the second day.

Velvety Cream of Mushroom Soup with Herbs
by Judy 
Inspired by La Madeleine restaurant

4 cups chopped mushrooms
1 large onion, diced
1 teaspoon herbes de Provence
6 Tablespoons butter, divided
5 Tablespoons Bob's Red Mill Organic Whole Wheat Flour
1 cup half-and-half
1 cup heavy cream
1 Tablespoon concentrated beef base
2 cups beef broth
1/2 Tablespoon salt
1/2 Tablespoon black pepper
1/4 cup dry sherry
Fresh thyme for garnish

In food processor, process mushrooms until very finely chopped, but not quite pureed. In a skillet, saute onions in 2 tablespoons of the butter, then add the mushrooms and herbes de Provence and lightly saute. Set skillet aside. In Dutch oven or large heavy pan, melt remaining 4 tablespoons butter. Add the flour to make a roux, stirring constantly, and cook for about a minute. Whisk in half-and-half, cream, beef base, and broth, and cook over medium heat, whisking, until thickened. Add mushroom and onion mixture, salt, pepper, and sherry. Serve with a sprig of fresh thyme. Enjoy!